Crispy-Edged Quesadilla: A Timeless Comfort Classic
Published June 22, 2022
Total Preparation Time: 10 minutes
(Servings: 1 | Difficulty: Easy)
Ingredients
2 teaspoons of high-smoke-point oil (e.g., grapeseed, sunflower, or avocado oil; olive oil may burn at high heat)
1 (8-inch) flour tortilla (preferably whole-grain or high-fiber option like Ezekiel tortilla for added nutrition)
⅔ cup freshly shredded cheese (aged Cheddar, Monterey Jack, or Mexican cheese blend; critical: freshly shredded cheese melts more uniformly than pre-shredded, which contains additives like cellulose to prevent clumping and hinders meltability)
Equipment
Medium-sized cast iron or ceramic skillet (avoid non-stick pans due to potential PFA leaching from Teflon)
Heat-resistant spatula
Cutting board and knife (for optional ingredient prep)
Preparation Steps
Step 1: Preheat & Oil Distribution
Place the skillet over medium heat (350°F/175°C) and add the oil. Swirl the pan to ensure even coating of the bottom surface. Let the oil heat until it shimmers (approximately 20–30 seconds), indicating it’s ready for cooking.
Step 2: Cheese Application & Initial Folding
Place the tortilla in the preheated skillet. Spread the shredded cheese evenly across the center ¾ of the tortilla, leaving a ¼-inch border around the edges (this prevents cheese from leaking during folding).
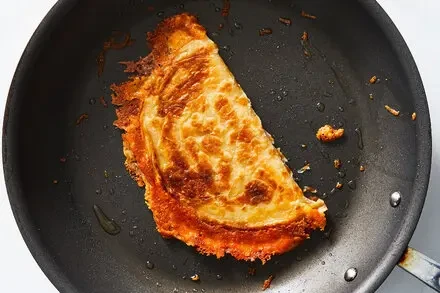
Cook undisturbed until the cheese begins to melt (30–45 seconds). To facilitate folding, first fold the tortilla in half along its vertical midline to form a "hinge" (this creates a stable fold without tearing).
Using the spatula, press firmly along the folded edge to seal, allowing excess cheese to leak into the pan. Continue cooking for 2–3 minutes, until the leaked cheese solidifies and turns golden-brown—this forms the signature crispy edges.
Step 3: Flip & Final Crisping
Use the spatula to carefully flip the quesadilla, ensuring even heat distribution. Cook for an additional 1–2 minutes on the second side, until the exterior is uniformly golden-brown and the cheese inside is bubbly and fully melted.
Slide the quesadilla onto a cutting board. Let it rest for 30 seconds to allow cheese to set, then slice into wedges (e.g., 4 triangular pieces) using a sharp knife.
Step 4: Serving Suggestions
Serve immediately with accompaniments like guacamole, salsa, or a dollop of sour cream. For added texture, top with avocado slices, sautéed spinach, or a sprinkle of hemp seeds.
Chef’s Pro Tips
Cheese Selection: Aged Cheddar is optimal for flour tortillas, balancing richness with a melt that crisps well. For a tangy twist, add 1 tablespoon of crumbled queso fresco.
Healthier Variation: Substitute oil with 1–2 sprays of olive oil (reduces fat content) and preheat both sides of the tortilla before adding cheese for extra crispiness.
Custom Fillings: Enhance flavor with ingredients like caramelized onions, sautéed mushrooms, or turkey slices. Spread cheese beyond the tortilla edges to create a crispy, golden perimeter.
Camping Adaptation: Pack pre-shredded cheese, a dry tortilla, and salsa in a portable container. Assemble and cook over a campfire or portable stove for easy, mess-free outdoor meals.
Key Notes
Cookware Safety: Non-stick pans may release PFAs when heated; use cast iron or ceramic pans for safer, toxin-free cooking.
Portability: Quesadillas travel well—wrap slices in parchment paper for on-the-go snacks.
Enjoy this crispy, melt-in-your-mouth classic, perfect for quick weeknight dinners or impromptu gatherings!
lunch
Total Preparation Time: 10 minutes
**Total Preparation Time**: 10 minutes